Powerful spreadsheets may be used to view, sort and edit the input data
and results. The spreadsheets and model views are synchronized
For additional advice on this topic, please see the RISA Tips & Tricks webpage at risa.com/post/support. Type in Search keywords: Advanced Spreadsheet.
To move between cells in a spreadsheet, click any cell or use the keyboard arrow keys. When you move to a cell it becomes the active cell. To see a different area of the spreadsheet use the vertical scroll bars on the right side of the spreadsheet.
| To Scroll | Do This |
|---|---|
|
One row up or down |
Click the arrows on the vertical scroll bar. |
|
One column left or right |
Click the arrows on the horizontal scroll bar. |
|
One page up or down |
Click above or below the scroll box in the vertical scroll bar. |
|
One page left or right |
Click to the left or right of the scroll box in the horizontal scroll bar. |
|
A large distance |
Drag the scroll box to the approximate relative position. |
Note:
The following keyboard commands are available:
| Key | Function |
|---|---|
|
Arrow Keys |
Move the active cell one location |
|
TAB |
Move right one cell |
|
ENTER |
Move to the first column of the next line. Adds new line if necessary. |
|
PAGE UP |
Move the active cell one full page up. |
|
PAGE DOWN |
Move the active cell one full page down. |
|
HOME |
Move to the first line of the spreadsheet. |
|
END |
Move to the last line of the spreadsheet. |
|
F3 |
Insert new line below current line. |
|
F4 |
Delete current line. |
|
F8 |
Insert new line below current line and repeat the current values in the new line. |
Before you can carry out commands or tasks in a spreadsheet, you must select the cells that you want to work with.
| To Select | Do This |
|---|---|
|
A single cell |
Click the cell, or press the arrow keys to move to the cell. |
|
A range of cells |
Click the first cell of the range, and then drag to the last cell. |
|
An entire row |
Click the row heading. |
|
An entire column |
Click the column heading. |
|
Adjacent rows or columns |
Drag across the row or column headings |
Note:
RISA-2D
provides you with virtually unlimited Undo capability so that you may easily correct
mistakes or just back up to try different possibilities. Simply
click the Undo button
RISA-2D
provides you with virtually unlimited Redo capability so that you may reapply actions that were previously undone. Simply
click the Redo button 
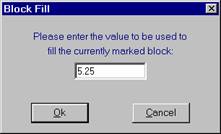
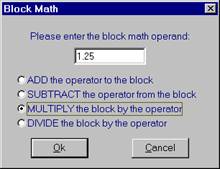
The spreadsheets have been specifically developed for the input and editing of structural models. There are many ways to edit the spreadsheets allowing you to quickly build your model. You may copy and move data from other locations or other files. You may also fill large blocks of cells automatically and perform math on these cells.
To Change Basic Load Cases in a Load Spreadsheets

To Perform Math on Selected Cells
 button.
Note
To insert cells you must insert an entire row. When you delete cells you must delete an entire row. The row is removed from the worksheet and shifts the lower cells to fill the space. When you clear cells, you remove the cell contents but leave the blank cells on the spreadsheet.
To Insert Rows


To Clear Cell Contents
To Delete Rows

Note
Standard Windows
To Move or Copy Cells
To move cells select Cut on the Edit Menu.

To Move or Copy Cells between Existing Cells
To move cells select Cut on the Edit Menu.
To Move or Copy Cells to Another File
To move cells select Cut on the Edit Menu.
Note:
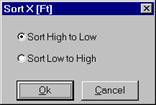
You may sort spreadsheets by
the values in most any column. Simply click in the column you wish
to sort, click on the Sort 
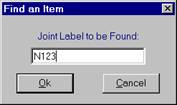
You may relabel the
To locate or find a specific joint, member,
or plate while in a spreadsheet, click the Find 
Many of the spreadsheets provide the option to save the current data as the default and every new file subsequent to the save will already have that data. This way the office standards that you might use in most of your models are already entered and available in new models. This feature is available in the following spreadsheets: Materials, Design Rules, Footings, and Load Combinations.
To save default data simply click the Save as Defaults 
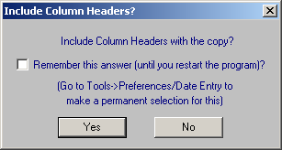
For all Results spreadsheet, the program is capable of exporting them into Excel Spreadsheet.
The process is as follows:
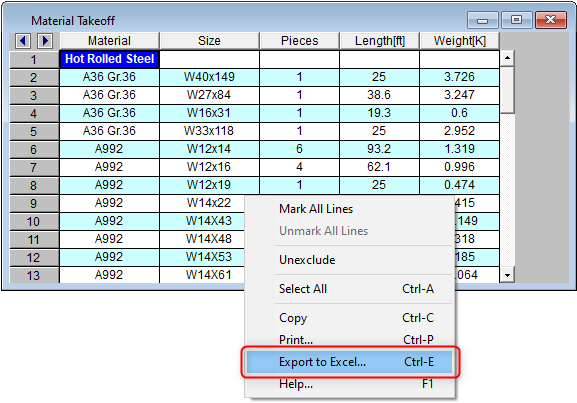
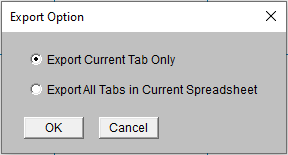
Note: The Export to Excel can also be used by clicking the button on ribbon  .
.
There are special functions that help
you with a particular spreadsheet.
Click ![]() to approximate
the K factor for the current member or all of the members. See K Factors (Effective Length Factors)
learn more about this feature.
to approximate
the K factor for the current member or all of the members. See K Factors (Effective Length Factors)
learn more about this feature.
Click ![]()
Click ![]()
![]()
Click ![]() ,
, ![]() or
or ![]() to solve the current load combination,
batch, or envelope solutions.
to solve the current load combination,
batch, or envelope solutions.
You may click 
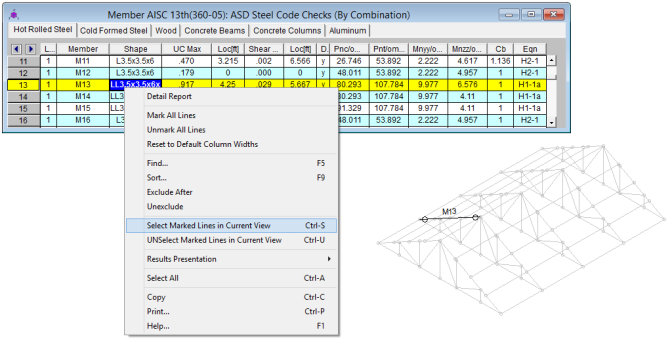
In certain results spreadsheets there is the capability to have elements selected graphically.
The process is as follows:
 .
.Note: The inverse process can be used to Unselect Marked Lines using the  .
.